Are you ready to add some excitement to your trading journey? The Hypurr Fun Bot is like the Pumpfun experience on Solana but made even easier! Running on Telegram and powered by the Hyperliquid blockchain, it offers a unique and hassle-free way to trade with a twist. Whether you’re new to these bots or just curious about what makes Hypurr stand out, this step-by-step guide will get you started. Let’s dive in and explore the fun side of trading!
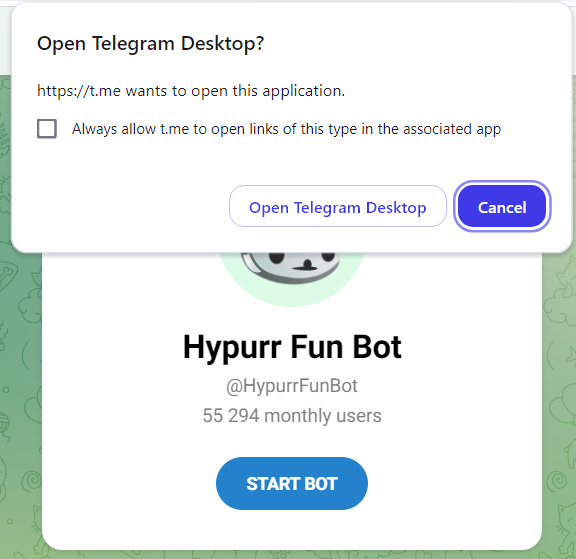
Step 1: Click the link to sign up with Telegram on either your mobile or desktop device. Make sure you have Telegram installed before proceeding.
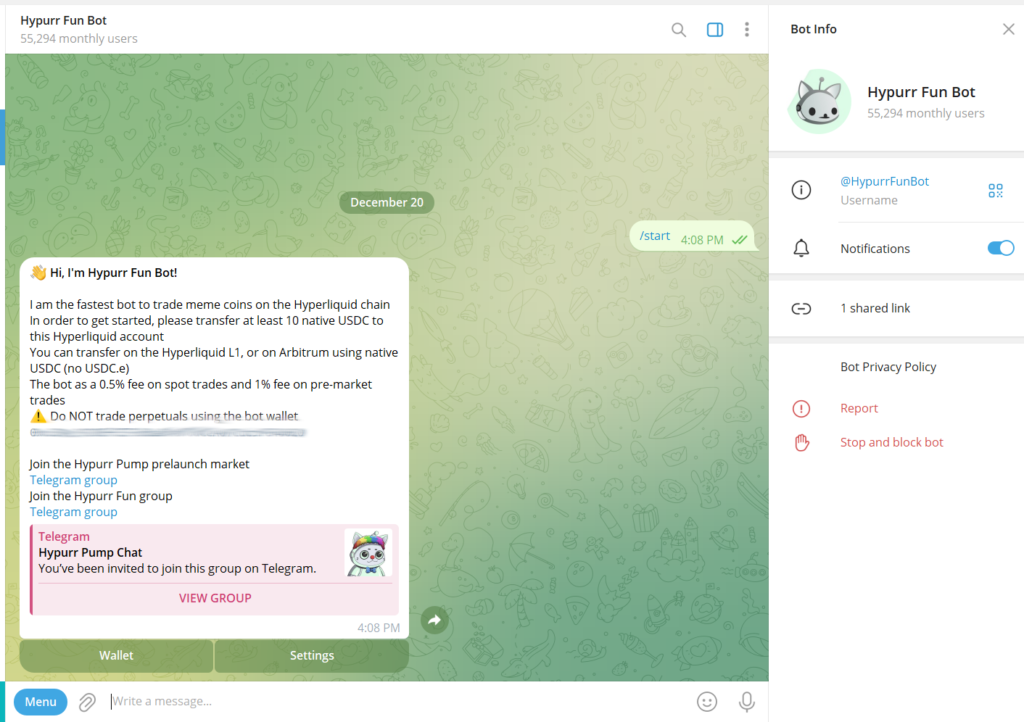
Step 2: Click Start to automatically create your wallet. While you’re at it, consider joining the recommended Telegram groups for updates and community support.
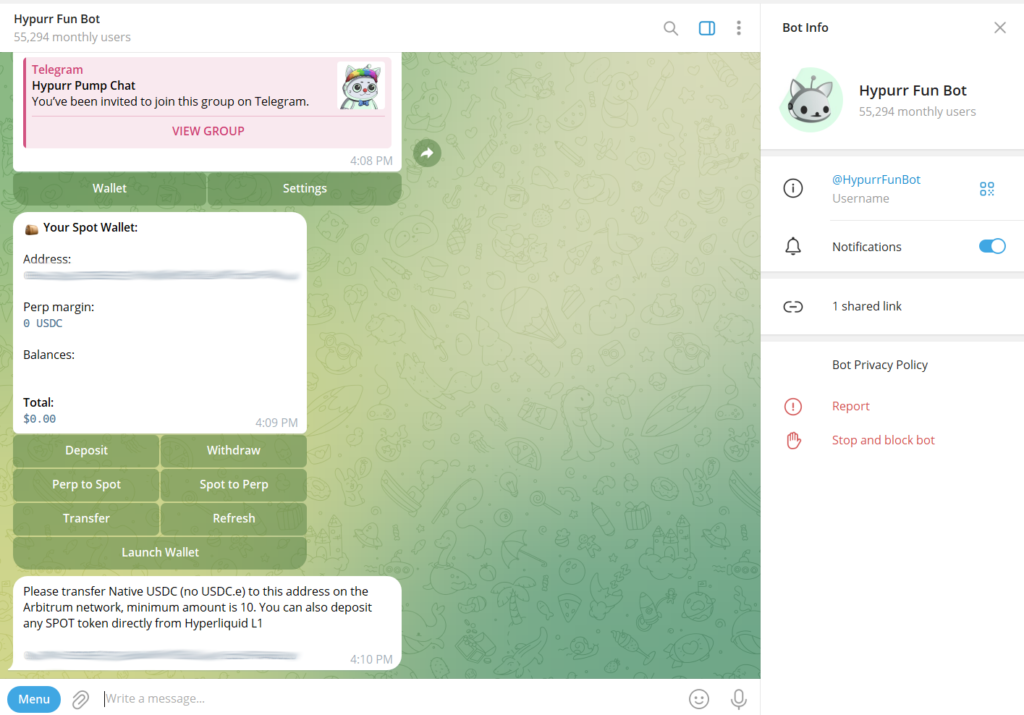
Step3: Click Wallet to view your wallet’s details, including your address. To add funds, click Deposit and follow the instructions. You can send USDC via the Arbitrum network or directly from your Hyperliquid L1. The minimum deposit is $10. It’s always a good idea to start small—send the minimum amount first to confirm it arrives before adding more.
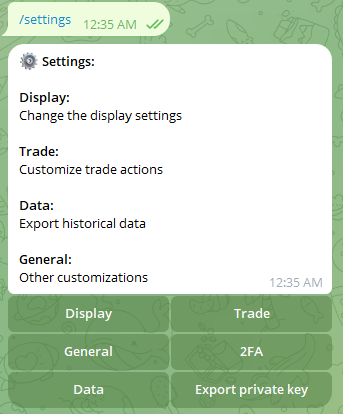
Step 4: Type /settings to customize your wallet settings, including slippage. Most importantly, use this step to back up your private key. Write it down and store it securely—do not share it with anyone. Your private key is your wallet—anyone with it has access to your funds.
Step5: After your funds arrive, you may need to click Perp to Spot to transfer your funds for purchasing newly launched tokens.
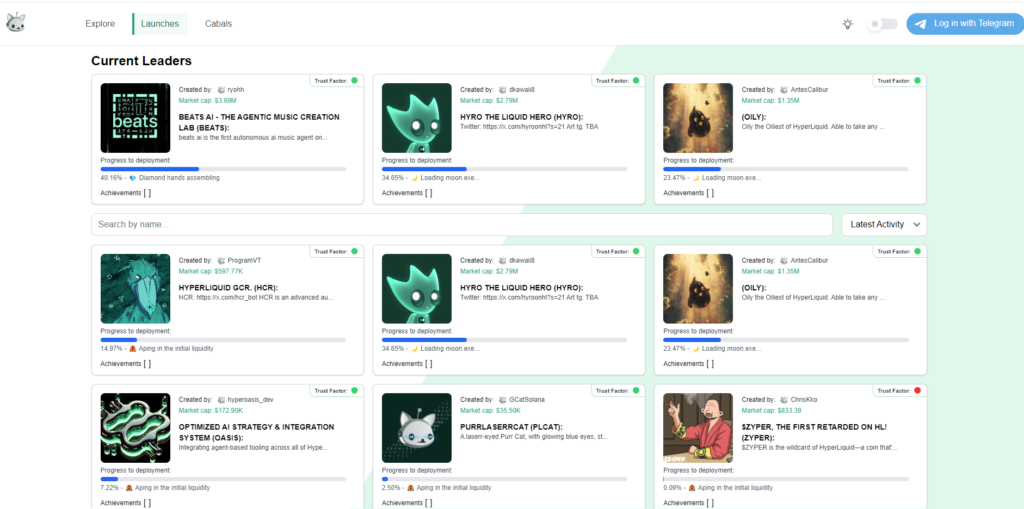
Step6: Visit https://app.hypurr.fun/launches to explore the latest token launches. Carefully review each token’s trust factor and market cap, and conduct thorough research before investing. Warning: These tokens often have small market caps, making them highly risky with potential rug pulls and scams. Be as selective as possible and only invest what you can afford to lose. Once you’ve found a token that interests you, return to Telegram
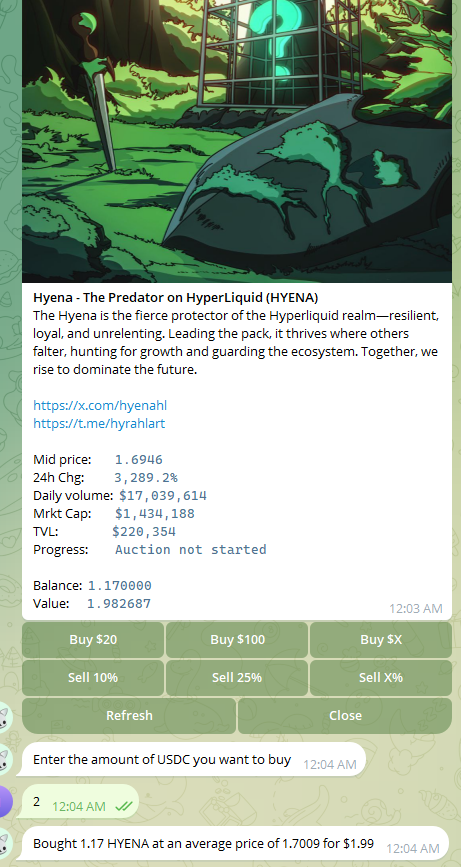
Step7: In Telegram, type /launches and use the right arrow to find your chosen token. Once you locate it, click on the token name. For example, I’ll click on HYENA.
Step 8: Once selected, the token’s details will appear, along with options to Buy or Sell.
Step 9: Click Buy $X and select your desired amount. When a token reaches a $10M market cap, it gets deployed on Hyperliquid, exposing it to a broader audience. Keep in mind, this can lead to significant price movement—it may surge higher or face a dump. For instance, HYENA recently bonded, and I’ll keep you updated on the deployment process.
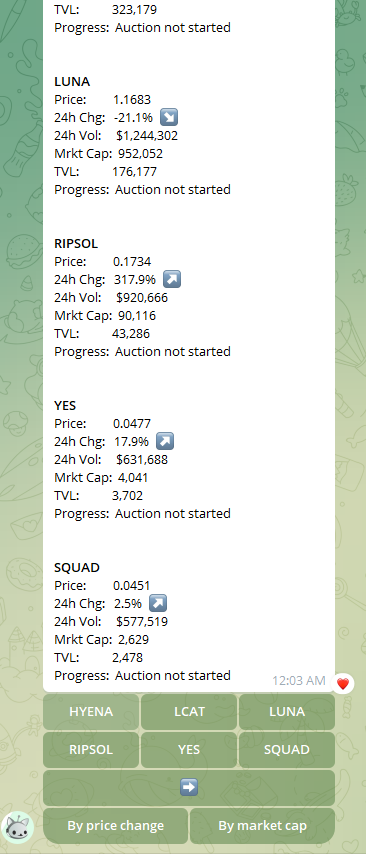
Final Tip: Hypurr Bot isn’t just for launches—it also lets you snipe tokens, initiate TWAP orders on Hyperliquid’s SPOT tokens, and more. Explore its features and trade responsibly!
Summary
The Hypurr Fun Botbrings a fresh and exciting twist to trading, combining fun and innovation on the Hyperliquid blockchain with the simplicity of Telegram. Whether you’re a seasoned trader or just exploring something new, it offers an experience that’s hard to ignore.
However, as with any trading activity, it’s essential to approach with caution. Remember, markets are unpredictable, and while Hypurr can add fun to the process, it doesn’t eliminate the risks involved. Always trade responsibly, do your research, and only use funds you can afford to lose.
Now that you know the basics, it’s time to see what Hypurr can do. Trade smart, have fun, and enjoy the journey!
The world of decentralized finance (DeFi) continues to evolve, presenting innovative ways to harness unused resources. Among the most promising entrants is NodePay, a platform that transforms idle internet bandwidth into a revenue-generating asset. If you’ve ever wondered how to earn passive income without additional work, NodePay could be the opportunity you’ve been seeking. However, as with any new technology, understanding its benefits, risks, and practical applications is essential.
What Is NodePay?
NodePay is a blockchain-powered network that enables users to share their unused internet bandwidth with AI companies and organizations. By doing so, participants contribute to critical tasks like AI model training, distributed computing, and data processing. In return, they earn cryptocurrency rewards proportional to their shared bandwidth, making it a win-win scenario for contributors and businesses alike.
Why NodePay Stands Out
NodePay combines the DeFi and AI sectors, creating a unique value proposition. Here’s what makes it noteworthy:
Decentralized Bandwidth Marketplace: Unlike traditional centralized providers, NodePay creates a transparent, blockchain-driven platform where AI companies can access bandwidth for their needs.
User-Friendly Setup: With a simple web extension, users can easily create accounts and activate their nodes, making bandwidth-sharing accessible even to non-tech-savvy individuals
Passive Income: NodePay allows users to earn without technical expertise or active involvement. The more bandwidth you share, the more you earn.Privacy Emphasis: Through encryption and blockchain technology, NodePay ensures that your personal data remains protected, with no exposure to third parties.
Is It Safe?
NodePay prioritizes user privacy and security. Data shared via the network is encrypted, and personal information remains inaccessible to participating businesses. However, users should remain vigilant as all DeFi platforms carry inherent risks. The value of rewards (in cryptocurrency) is subject to market volatility, which may impact earnings. As with any software, it is important to consider the possibility of undiscovered security vulnerabilities.
Resource Demands: What to Expect
CPU Usage: NodePay runs efficiently in the background, exerting minimal strain on your device. It’s unlikely to disrupt everyday usage unless you’re using older hardware.
Bandwidth Sharing: Participants retain control over how much bandwidth they allocate to NodePay. By setting appropriate limits, you can ensure that your regular internet activities remain unaffected.
Risks to Consider
While NodePay offers exciting prospects, it’s not without its challenges:
Bandwidth Constraints: Sharing too much bandwidth may slow your internet connection, especially for users with limited or capped plans.
Earnings Volatility: Since rewards are in cryptocurrency, their value can fluctuate significantly, potentially impacting your passive income.
Device Dependence: To maximize rewards, users are encouraged to keep their devices connected and running, which may increase power consumption.
Set Up Your Account: Create a profile to access your dashboard and manage settings.
Activate Your Node: Start sharing bandwidth and watch your earnings grow.
Optimize Settings: Experiment with bandwidth limits to balance earnings with internet performance.
Summary
NodePay represents a groundbreaking intersection of blockchain and AI, offering a glimpse into the future of decentralized resource sharing. For those with unused bandwidth and a curiosity for crypto rewards, it’s a compelling opportunity. However, it’s vital to weigh the risks, monitor resource usage, and stay informed about market trends.
Whether you’re an early adopter eager to explore innovative income streams or a cautious observer weighing the trade-offs, NodePay is undoubtedly a platform worth watching as it pioneers a new frontier in decentralized finance.
The explosive growth of perpetual decentralized exchanges (perp DEXs) like LogX, Drift, Hyperliquid, and Aevo highlights their innovation and growing popularity in crypto trading. However, a market characterized by volatility and surging interest poses challenges—especially during bull market spikes and liquidity crunches. Below, we break down the critical mechanisms that perp DEXs use to mitigate risks and explore the potential vulnerabilities for liquidity providers (LPs) and traders holding profitable long positions.
Understanding Portfolio-Based Margining
Portfolio-based margining is a system used by several perp DEXs to manage traders’ positions. Unlike isolated margining, where each position has its own margin requirement, portfolio-based systems evaluate the risk across all of a trader’s positions collectively.
How It Works:
If you hold a profitable long position on one asset but a losing short on another, the system may offset the two, considering the net risk of your entire portfolio rather than liquidating one position immediately.
This can be advantageous as it reduces premature liquidations during moderate volatility, allowing traders to manage risks dynamically.
The Risks:
Full Portfolio Liquidation: In extreme scenarios, if the combined value of your portfolio drops below the maintenance margin, the platform could begin liquidating all positions, even profitable ones, to cover the shortfall.
Increased Complexity: For traders, managing risk becomes more intricate as they need to monitor the interplay between different positions rather than focusing on each trade individually.
What Happens During a Liquidity Crunch?
Liquidity crunches occur when the available liquidity in the market dries up, usually during high volatility or when liquidity providers (LPs) withdraw capital en masse.
Impact on Traders:
Slippage: Closing a profitable long position in a liquidity-starved environment can result in high slippage, reducing returns or even turning profits into losses.
Execution Risk: If liquidity is insufficient, a trader’s order might not be filled entirely, leaving them exposed to further market risks.
Impact on LPs:
Volatility Risks: LPs face the possibility of bearing losses if their positions cannot be properly hedged during extreme market moves.
Incentive Drain: During high volatility, LPs may exit en masse unless incentivized with significantly higher returns, leaving the DEX vulnerable.
Strategies for Risk Mitigation in Perp DEXs
LogX and Drift:
Dynamic Margining: Drift utilizes portfolio-based margining and advanced liquidation engines, focusing on partial liquidations to minimize cascading effects. These measures protect LPs and reduce risks to traders during volatile periods.
Risk Monitoring: Continuous monitoring of user positions ensures the platform acts swiftly to mitigate risks.
Hyperliquid:
Insurance Fund: Hyperliquid allocates a percentage of trading fees to an insurance fund, which acts as a safety net during liquidity crises. This reduces the risk of LP exits and helps traders close positions without undue losses.
Validator-Driven Security: Its proof-of-stake model ensures network resilience and scalable transaction processing even under heavy loads.
Aevo:
Hybrid Order Book Model: Aevo uses off-chain order books for speed and on-chain settlement for transparency. It combines the best of centralized and decentralized systems.
Incremental Liquidation: This prevents the system from over-liquidating user portfolios, which can exacerbate liquidity shortages.
Potential Improvements
Dynamic LP Incentives: Platforms need to ensure LPs are compensated adequately during high-risk periods to prevent liquidity drains.
More Robust Insurance Mechanisms: Insurance funds should cover not only extreme events but also provide a buffer for less dramatic market downturns.
Emergency Liquidity Pools: Introducing secondary liquidity pools accessible during crises can stabilize trading activity.
For perp DEXs to thrive in increasingly volatile markets, they must prioritize liquidity stability and user confidence. While innovations like portfolio-based margining, insurance funds, and hybrid settlement models offer a foundation, the risk of liquidity crunches—especially during bull market spikes—remains.
For users, choosing platforms like Hyperliquid or Aevo with robust risk mitigation strategies is vital, especially if holding large or leveraged positions. Meanwhile, DEXs must balance trader incentives with LP protections to sustain their ecosystems during both bull and bear markets.
Oracle Price Risk in Perp DEXs
Oracle systems are critical for perpetual DEXs as they provide accurate price feeds to determine funding rates, margin requirements, and liquidation thresholds. However, they introduce a unique set of risks that can destabilize the platform and lead to cascading effects during high market volatility or manipulation attempts.
What is Oracle Price Risk?
Oracle price risk arises when the data used by a DEX to determine the value of assets is delayed, manipulated, or outright incorrect. Since perp DEXs rely on these feeds to trigger critical actions like liquidations and margin updates, inaccurate or lagging data can lead to severe consequences:
Delayed Liquidations: If an oracle fails to reflect the true market price during rapid price movements, the platform might delay liquidating under-margined positions, exposing LPs to additional losses.
False Liquidations: Manipulated or incorrect prices can trigger unwarranted liquidations, wiping out user positions unfairly.
Excessive Funding Costs: Erroneous price feeds can skew funding rates, leading to unfair costs for traders maintaining long or short positions.
Key Risks and Examples
Price Manipulation:
On-chain oracles can be exploited if attackers manipulate low-liquidity pools to feed false prices into the system.
Example: Flash loan attacks have historically been used to manipulate oracle prices, causing massive losses for DeFi platforms.
Latency and Update Frequency:
High-frequency trading environments require near-instantaneous price updates. Any lag can cause discrepancies between the DEX price and the broader market price, creating arbitrage opportunities or liquidity mismatches.
Off-Chain Dependency:
Platforms using centralized oracles risk becoming vulnerable to outages or single points of failure.
How Perp DEXs Mitigate Oracle Risks
LogX and Drift:
Advanced Oracle Mechanisms: These platforms typically rely on hybrid oracles, combining on-chain data aggregation with off-chain price feeds to improve accuracy and reduce latency.
Price Impact Protection: Drift employs mechanisms that prevent the oracle price from deviating excessively from the spot market price during sudden swings.
Hyperliquid:
Custom Oracle Integrations: Hyperliquid uses a combination of centralized and decentralized oracle solutions, ensuring faster and more reliable price updates. The protocol also monitors for significant deviations, mitigating risks from sudden spikes or drops.
Aevo:
Proprietary Oracles: Aevo leverages its own oracle system, designed to integrate directly with its hybrid model. By controlling the price feed pipeline, it ensures consistency and minimizes the risks of external manipulation.
Best Practices for Traders and LPs
Diversify Trading Platforms: Spreading positions across multiple DEXs reduces the impact of oracle-specific risks on a single platform.
Monitor Oracle Integrity: Traders should keep an eye on oracle updates and any discrepancies in reported prices versus spot markets.
Conservative Margining: Maintain larger buffers in volatile markets to account for potential delays or inaccuracies in price feeds.
Oracle price risk is a critical, often underestimated vulnerability in perp DEXs. While platforms employ innovative measures to address these risks, the reliance on oracles will always introduce a layer of unpredictability. Mitigating this requires a combination of robust technical solutions, user vigilance, and platform transparency to ensure fair and secure trading environments.
Ready to start your trading on-chain?
Explore the cutting edge of decentralized perpetual trading with these top platforms:
Hyperliquid, a decentralized exchange (DEX), is redefining perpetual trading with its innovative approach to speed, transparency, and trading efficiency. Built on its proprietary HyperBFT blockchain, the platform combines the best of centralized exchange (CEX) performance with decentralized finance (DeFi) principles. This article explores its strengths, potential challenges, and how it compares to competitors like Orderly Network and LogX.
Key Strengths of Hyperliquid
1. Ultra-Low Latency and High Throughput
Hyperliquid’s standout feature is its HyperBFT consensus mechanism, enabling near-instant trade execution with a latency of just 0.2 seconds. Capable of processing up to 100,000 transactions per second, the platform delivers an unprecedented trading experience for high-frequency traders and institutional players.
2. Fully On-Chain Order Book
Unlike many DEXes that rely on off-chain components, Hyperliquid’s order book and matching engine are entirely on-chain. This approach ensures transparency, allowing users to independently verify trades while maintaining decentralization.
3. Advanced Trading Tools
Hyperliquid offers sophisticated tools that rival those of top CEXes. These include:
Leverage up to 50x.
Advanced order types such as Take Profit/Stop Loss.
Integration with TradingView for seamless charting and analysis.
4. Cost Efficiency
The platform eliminates gas fees for trades, charging only minimal fees for deposits and withdrawals. This structure is particularly attractive to high-frequency traders who value low-cost operations.
5. Community-Driven Liquidity
The Hyperliquidity Provider (HLP) program allows users to contribute liquidity and earn rewards. Additionally, the referral program incentivizes community growth, fostering a robust user base.
Challenges Facing Hyperliquid
1. Competing with Established Players
Hyperliquid faces stiff competition from market leaders like Binance and dYdX, as well as emerging platforms like Orderly Network and LogX. Convincing traders to migrate remains a key challenge.
2. Perceived Centralization
Despite its decentralized ethos, Hyperliquid’s proprietary Layer 1 raises concerns about centralization. Future plans to decentralize its infrastructure aim to address this issue but will require time to implement.
3. Retail User Accessibility
While professionals benefit from its advanced tools, new traders may find the platform’s features intimidating. Simplifying the user interface could broaden its appeal.
4. Liquidity Challenges
As a new platform, Hyperliquid must scale its liquidity to match competitors. Its innovative programs aim to attract market makers, but this remains a work in progress.
Ready to Experience Hyperliquid?
Discover the next level of decentralized trading with Hyperliquid. Discover Hyperliquid!
Challenges of Hyperliquid
1. Competition from Established Players
While its features are robust, Hyperliquid competes with giants like Binance and Uniswap. Convincing users to migrate or adopt it as a primary platform remains an uphill battle, despite its speed and transparency.
2. Centralization Concerns
Despite its decentralized framework, Hyperliquid’s proprietary Layer 1 architecture raises questions about the level of centralization. Until its planned decentralization initiatives are fully realized, this may deter purist DeFi users.
3. Learning Curve for New Users
For retail traders accustomed to simpler interfaces, Hyperliquid’s advanced tools and order types may seem complicated. While these features attract professionals, they might deter casual users.
4. Scaling Liquidity
To compete effectively, Hyperliquid must ensure deep liquidity across trading pairs. As a new platform, it must actively attract market makers and trading volume to sustain its order book model.
Comparison with other leading Perps platforms
Here’s a comparison with other leading platforms like dydx, logx and aevo
Key Metric
Hyperliquid
dYdX
LogX
Aevo
Execution Speed
0.2s latency, 100,000 TPS via HyperBFT
~1s latency (StarkEx L2), moving to Cosmos
100ms latency on Layer-2
Low latency via Layer-2 (EVM-compatible)
Liquidity Source
Decentralized liquidity pools
Robust DEX liquidity pools
Aggregated from CEXs like Binance and Coinbase
Decentralized liquidity pools
Trading Volume
Over $1B daily volume
$331M+ daily volume
Volume spread across integrated networks
Specialized in derivatives; lower overall volume
Transaction Costs
Gasless trading for orders, minimal withdrawal fees
Gas costs on StarkEx Layer-2
Gasless trading via $LOGX subsidies
Low costs on Layer-2
Product Specialization
Perpetual swaps, professional-grade tools
Perpetual swaps, margin trading
Cross-chain interoperability, infinite liquidity
Perpetuals and options
Strength
Ultra-low latency, fully on-chain order book
Proven track record, massive community
Deep liquidity from CEX aggregation
Derivatives-focused innovation
Challenge
Centralization concerns, liquidity scaling
Migration risks, UI complexity
Dependence on CEX liquidity
Niche product appeal, competitive space
Ready to Experience High-Speed Trading on Hyperliquid?
Join Hyperliquid today and enjoy the perfect blend of speed, transparency, and advanced trading tools. Start trading now!
The crypto world is infamous for its unpredictability, and few phenomena capture this chaos like rug pulls—projects designed to siphon funds from unsuspecting (or fully aware) participants. Despite the inherent risks and countless cautionary tales, thousands of people continue to flock to these schemes. Why? The answer lies in a fascinating mix of psychology, market dynamics, and cultural norms.
The Psychology Behind Risky Decisions
1. The Thrill of Risk
Many rug pull participants experience an adrenaline rush akin to gambling. The opportunity to make outsized returns in a short time—despite the odds—triggers excitement and engagement. The risk itself becomes part of the appeal, a game to beat before the inevitable collapse.
2. Fear of Missing Out (FOMO)
FOMO drives much of crypto investing, but it’s particularly potent with rug pulls. Seeing others boast about massive gains in questionable projects can be hard to ignore. Even if investors recognize the risk, they’d rather take a chance than feel left out.
3. Overconfidence in Outrunning the Collapse
Rug pulls operate like a ticking time bomb, and participants often believe they can outsmart the system. This overconfidence leads them to think they’ll be among the first to cash out, leaving the losses for others to absorb.
4. The “Greater Fool” Mentality
Some knowingly enter rug pulls with the belief that they can sell their tokens to someone even less informed or more reckless. This greater fool theory perpetuates the cycle, as participants gamble on being smarter than the next person.
Rug Pulls as Gambling: The Addiction to Speculation
Crypto markets have gamified investing, blurring the lines between financial activity and gambling. Rug pulls amplify this dynamic:
Dopamine Hits: The act of placing a risky bet and watching its potential payoff stimulates dopamine production, creating a cycle of anticipation and excitement.
High-Risk, High-Reward: The potential for life-changing gains in minutes or hours keeps people hooked, even if they know the odds are against them.
The Cost of Playing: Many participants justify losses as the “price of admission” to the crypto casino, normalizing the risk of being rugged.
Social Proof and Herd Behavior
1. Influencer Hype
Crypto influencers and anonymous accounts often hype questionable projects, intentionally or otherwise, creating a perception of legitimacy. Seeing a community rally behind a project can validate decisions to participate, even when red flags are obvious.
2. Herd Mentality
When everyone else seems to be rushing into a project, the fear of being left behind can cloud judgment. Herd behavior drives participants to ignore risks, reasoning that they can’t all be wrong.
Rationalizing Losses
Even after losing money, participants often remain undeterred. Here’s why:
Normalization of Scams: In the fast-paced world of crypto, scams like rug pulls are often viewed as a natural part of the game.
Optimism Bias: Many believe the next gamble will be different and that they’ll finally strike it big.
Social Validation: Sharing losses with others who’ve experienced the same reinforces the idea that it’s just part of the crypto journey.
Why Losing Might Even Be Part of the Thrill
Interestingly, for some, the possibility of losing might add to the emotional high. Similar to gamblers chasing their next big win, the ups and downs of rug pulls can become addictive, overshadowing rational decision-making. It’s not the loss itself they seek but the rush of being part of the game.
What Does This Mean for the Future?
Understanding why people engage in rug pulls highlights a deeper need for education and safeguards in the crypto space. While speculative behavior will always exist, creating systems that reward long-term value and transparency could shift the focus away from get-rich-quick schemes.
Conclusion
Rug pulls are a wild, high-risk game that shows how speculative crypto markets can be. People jump in for the thrill, hoping to outsmart others or just to chase a quick profit. But the mix of FOMO, overconfidence, and the normalization of scams makes it easy to get caught up in the frenzy. By understanding why we take these risks, we can make smarter decisions and focus on more sustainable opportunities in the long run.
To provide the best experiences, we use technologies like cookies to store and/or access device information. Consenting to these technologies will allow us to process data such as browsing behaviour or unique IDs on this site. Not consenting or withdrawing consent, may adversely affect certain features and functions.
Functional
Always active
The technical storage or access is strictly necessary for the legitimate purpose of enabling the use of a specific service explicitly requested by the subscriber or user, or for the sole purpose of carrying out the transmission of a communication over an electronic communications network.
Preferences
The technical storage or access is necessary for the legitimate purpose of storing preferences that are not requested by the subscriber or user.
Statistics
The technical storage or access that is used exclusively for statistical purposes.The technical storage or access that is used exclusively for anonymous statistical purposes. Without a subpoena, voluntary compliance on the part of your Internet Service Provider, or additional records from a third party, information stored or retrieved for this purpose alone cannot usually be used to identify you.
Marketing
The technical storage or access is required to create user profiles to send advertising, or to track the user on a website or across several websites for similar marketing purposes.